
New to Orienteering?
Orienteering is an exciting outdoor adventure sport which involves navigating around a course using a detailed map and sometimes a compass.
The aim is to navigate between a set of control points and decide the best route to complete the course in the quickest time.
It does not matter how young, old or fit you are, as you can go at your own pace.
The aim of orienteering is to navigate in sequence between control points marked on a unique orienteering map. There’s no set route between the controls, so you have to decide which way to go and then find your way there as quickly as you can. It doesn’t matter how young or old, fit or unfit you are, as you can run, walk, or jog, progressing at your own pace. Age is no barrier to the fun of orienteering, and family groups often take part in events. Orienteering can be a highly competitive sport, with elite athletes competing at the very top level in world competitions, but most people compete for fun and personal satisfaction with local and neighbouring clubs. They enjoy the social side of the sport, meeting up with friends at different events.
Orienteering can take place almost anywhere, from the remotest forest and countryside (including open moorland and coastal sand dunes) to urban areas, parks and school playing fields. It’s a great sport for anyone who just loves to be outdoors. It is also a very good way for runners, joggers and walkers to improve their navigation skills.
All orienteering events have a variety of courses available, with different lengths and technical difficulty. You can choose the course which suits you best. If you are absolutely new to orienteering, you will probably find that a local event (Level D) is the best place to begin, and the description below applies to local events. ESOC local events are suitable for all levels of experience. We have volunteers on hand to provide information, support and encouragement. For details of our forthcoming events, please have a look at our Events page.
The event details will include directions to help you find the event, and usually there will be signs to direct you from the nearest main road. There is usually a small fee for parking.
What happens at a local orienteering event
- What to wear
You don’t need special clothes to start with – choose your clothes according to whether you expect to walk, jog or run. You should always wear full leg cover, unless you know you will be orienteering on streets. You will need trainers or trail running shoes. There may be rough ground, and you might get quite wet and muddy, depending on the area and weather. If you become a regular competitor, you will probably want to buy some special orienteering kit, and some hard-wearing, orienteering shoes with good grip. - What to bring
If you have a compass and know how to use it, even at the most basic level, then bring it. You are not allowed to use a GPS or the map on your phone to help you navigate.
It is a good idea to bring a change of clothes and shoes, as well as something to eat and drink afterwards. - On arrival
Registration is often in a tent, or maybe a car, or possibly indoors. The courses on offer will be displayed, showing the distance and the amount of climb involved for each course. You can choose a course and enter the event - you will need to give your name, contact details and age.
Nearly all events use electronic timing, and you will be able to borrow a small electronic recording device (usually a Sport Ident SI-Card) which you attach to one finger, and use to record your arrival at each control. If the event is not using electronic timing, you will be given a control card to take with you, and you will need to use the pin-punch at each control to mark the appropriate box on the control card.
There may be small printed sheets available, showing the control descriptions for your course, telling you what sort of feature each control will be on, for example a path junction, boulder, or ditch. These details are also printed on the map.
You might be given your map at Registration - if not, you will get it at the Start.
If there’s anything you need to know, don’t hesitate to ask. - At the Start
You will have to clear previous data from your SI-Card by punching the electronic box marked "Clear". Hold your SI-Card in the box for a few seconds until it beeps and a red light flashes. You will also be asked to punch a box marked "Check". At local events, where the start is relatively informal, you will probably need to punch the “Start” box at the start line. For events that don’t use electronic timing, the start official will record your start time.
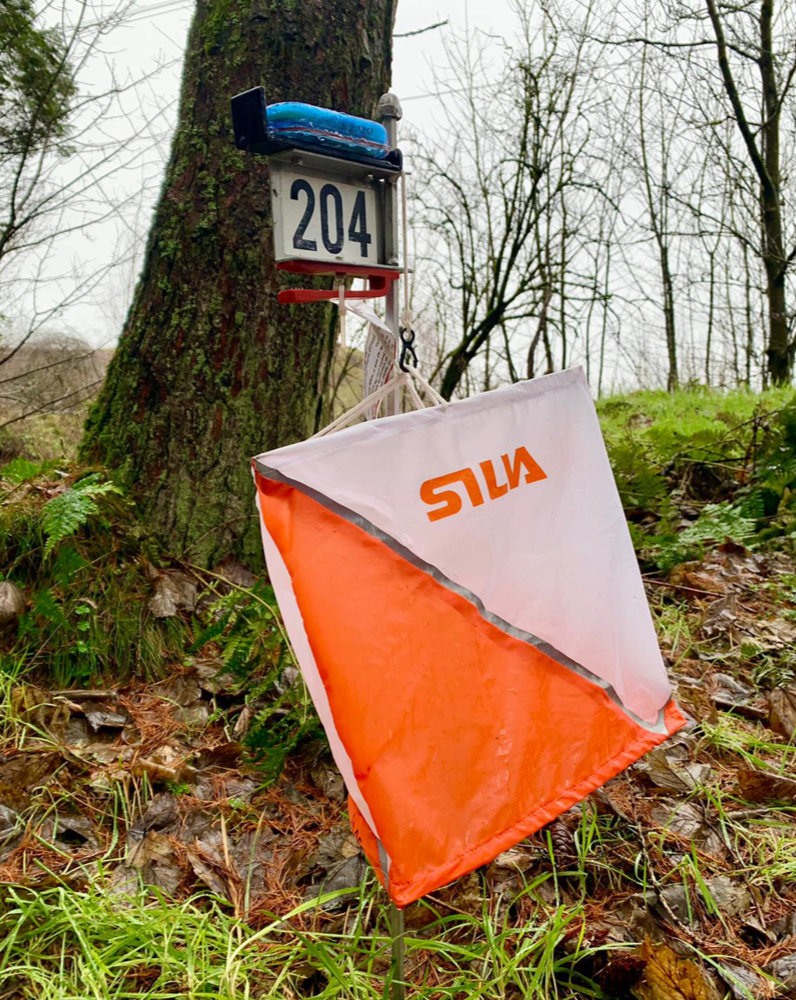
When you are told you can go, pick up your map, if you don’t have it already. The course is printed on the map - make sure you take the right map for your course. The Start Kite is shown on the map by a triangle. You need to match this with what you see at the Start Kite on the ground, turning the map so that it matches the landmarks. Then you can work out which way to go. - Going around your course
From the Start Triangle, make your way to control 1 marked on your map, turning your map each time you change direction, and continuing to match it with the features you pass. Every control on the course has a code number on it, and this number will be listed on the control descriptions. Check that the code number on the control is the one you’re expecting, so that you know you’ve found the correct control.
Move on to control 2, and so on, until you’ve visited each control on your course. You must punch the controls in the order shown on the map. If you miss a control out, or punch the wrong control by mistake, it’s still OK so long as you go to the correct control and then carry on from there. The electronic punching records which controls you have visited, and although any extra punches are disregarded, you will be disqualified if you do not visit all the controls on your course in the right order.
Remember that if you are an experienced runner, but new to orienteering, you may be able to run much faster than you can keep in touch with the map! If you get lost or make a mistake, you could go back to the last control you visited and take it again from there, or you could look around to find a very obvious feature on the ground and then find that feature on the map, to work out where you are. You should then be able to continue on your way. - The Finish
You haven’t actually finished your course until you punch the Finish, shown on the map by a double circle. This means you must keep going after you’ve punched the last control, until you reach the Finish and punch it. You can then relax! - Download
After you’ve punched the Finish, head for "Download". Here you will be asked to put your SI-Card into the Download box. This produces a printout of your overall time and includes your split times so you can see how long it took you to go between controls. Should you decide not to complete your course for any reason, you MUST still go to Download, so the event organisers know you are safe. And please don’t forget to return your SI-Card, if you borrowed one.
Usually there’ll be results on display, so you can compare your time with others on your course. The full results will be uploaded on to the organising Club’s website, often later the same day.
Orienteering Maps
Orienteering maps are drawn to a large scale, often 1:10000 (1cm on the map represents 100m on the ground) or 1:5000 (1cm = 50m). The map shows a lot of detail, much more than, for example, an Ordnance Survey map, including small features such as individual boulders, fences, and distinctive trees. It also shows the type of landscape around you, such as fields or woodland, and even how thick the woodland is; this is indicated by the colouring on the map. Using this information you can then decide whether it’s best to stay on paths, or take a more direct route. Map-reading and route choice are skills which, competitors refine with experience.
See the Maps section of this website for some examples.
There may be a key on the map. The colour of a symbol can often help you to work out what it means.
- Black – rock features e.g. cliffs, crags and boulders, and can also be used for man-made features.
- Brown – land shape, including contour lines, gullies, pits and knolls (small hills).
- Blue – water features, e.g. streams, lakes and ponds.
- Green – density of woodland and undergrowth. The shade of green indicates how much the woodland or undergrowth is likely to impede your progress. Progressively darker shades of green mean increasing density and slower pace. Note however that open (runnable) woodland is shown in white.
- Yellow – areas without trees. Solid, strong yellow is used for closely-cropped grassy areas, such as playing fields or mown areas. Paler yellow is used for rougher terrain, such as tussocky grass and heather. There can be quite a big variation in the actual runnability on light yellow areas.
Further Information
The ESOC Frequently Asked Questions page gives more details.
There's a useful introduction on the "What is Orienteering?" page of the Scottish Orienteering Association website, including their A-Z jargon buster.
The Newcomer's Guide on the British Orienteering website also contains helpful information.
JUNIORS
Orienteering is a great sport for families, because everyone can compete at their own level. For more information about junior opportunities in orienteering, see the Juniors page in the Information section of this website.
GUIDES
This orienteering map symbols page provides downloadable guides to the map symbols, which are very useful.
There's a downloadable guide to control description symbols on this IOF control descriptions page, which also includes a quiz.
VIDEOS
An introductory video: Start Orienteering || A Newcomer's Guide
A series of coaching videos, featuring members of the GB squad: Get Up To Speed
Getting started is the first video in a set of four made by Manchester orienteering club.
Others in the series:
Getting Going
Getting Confident
Getting Faster